Showing posts with label Cricut. Show all posts

One More Sleep To Go.......

One more sleep to go before the new catalogue goes live..... I am just sooooooo excited, there is so much lush stuff in there..... if you would like to buy a catalogue from me, they are £3 including postage, so just drop me an email at LindaLloyd@gmx.net.

Today I am showing you the 2 cards I made for my sons 14th Birthday, the above one was really easy to make, it was just a sheet of Patterned Paper from the Green Stack from DCWV, this is about a year old now so not sure if you can get it anymore.... and then I cut out Happy Birthday using my Cricut Expression..... easy peasy.....

This next card uses an image from The Greetings Farm, I love their images and they are a joy to colour in, I coloured it in using copic markers, the stars I cut out using my Spellbinders Nestabilities Stars.... and the circles were Nestie Circles... Happy Birthday sentiment is from Papertrey Ink.

I will be back tomorrow with some previews from the new catalogue, see you all then xx


Linda Lloyd signature logo

My New Craft Area.....

I decided Friday morning that I really needed more proper storage boxes for my craft area, I cannot work in mess (ha ha) and everything out on shelves everywhere constituted mess, so decided to buy some new shelves and storage boxes to put on them, so hunted on the Ikea website and took my daughter to Ikea, she has never been before and was about as impressed as her step dad is, but we got what we wanted.... (or at least what I wanted and she even built the units for me.....)

So not too much has changed on my main desk except I got rid of the trofast storage I had a put a 9 drawer unit in the middle instead, this leaves me more room to work and my monitor then sits on top of it, the drawers under the desk have been shuffled around a bit and my Cricut Expression still sits on my desk, I am worried that if I put it away I would never use it.... lol

This part is where most of the new storage is.... the shelves are kitchen units and I bought glass shelves for them as I thought they looked less obtrusive than wood ones, I also bought all the storage boxes too and there are even some that are still empty, they are the ones without labels in, yes I have finally got around to labelling stuff too... my flowers are piled sky high in drawers (yes I know why does one person need so many flowers and yet can never find what they want) and I got my mini sewing machine out to sit on the desk too..... the small white shelves that I had on my desk before now sit on top of the new white units.

Now this is the storage inside my mirror Pax Wardrobes, the middle sliding drawer holds all my current SU Stamp Sets and believe me it holds a lot, I do have most of them.... the top drawer holds all the SU punches that we have plus other punches too including my Martha Stewart ones... (I also have 2 other drawers of punches under the desk), the bottom sliding drawer holds my 40+ Cricut Cartridges and the white boxes at the bottom hold old magazines, US and non Current SU stamp sets and odds and ends to alter.... the very top shelf holds my PaperTrey Ink Cardstock and the next shelf down has my PTI ribbon and buttons....

This single wardrobe holds a drawer unit which holds tons of 12 x 12 Patterned Paper by loads of different companies, one of the large blue containers holds all my 6 x 6 and 8 x 8 Paper Pads another holds all my SU wheels and handles, another holds chipboard books and boxes, the drawers hold odds and ends like staples and staplers, spare blades for my Fiskars Trimmer, glue refills, small pom poms, just tons of odds and ends....


This double wardrobe holds my Paperwork for SU, including all my Tax Returns, invoices, the SU magazines we get, all my Tim Holtz stuff including paint dabbers, distress inks, stamp sets, all the staples, embossing powders, crackle paint, twisters, masks and anything else Tim Holtz you can think off.... aahh yes if you look carefully you can also see my Watercolour Pencils and on the bottom shelf is my printer labels and photo paper.... My Bazzill Basic Cardstock is on one of the shelves, one of the brown boxes holds all the Scrapbook Kits I bought and haven't used, the other one holds my Bind It All and all the wires and covers etc.... and also on the top shelf are some Scrapbook Albums that I have completed for myself...

The above photo is of all the wardrobe doors shut, I chose mirror doors to make our bedroom look bigger when it is filled up with my Craft Stuff.... ha ha. Unfortunately children finger prints and dog noses have made them not so clean and shiny....

This is my SU Ribbon Storage, it is hung on the end of the Mirror Wardrobes, my other ribbon is in 9 jars which are in one of the blue boxes in the first wardrobe storage....

and this shelf sits beneath the ribbon with all my dies that I have left on it (I sold 100s last summer at a car boot sale)..... Aaah yes my Quickutz dies are in the Paper Storage drawer inside the mirror wardrobe, they sit nicely in 2 big books filled with special QK binder storage sheets....

This is my SU Patterned Paper Storage, my SU Textured Card, Scrappin Kits and Chipboard, plus I have snuck in some October Afternoon and Basic Grey, and my Scenic Route (RIP)... my SU stamp sets and refills sit on top of it....
I have loads of stamps that I need to sell as you can see I am running out of room, so will be adding them to my Copic Marker Stand Post over the next couple of days, there will be a mixture of Magnolia, Sugar Nellie, SU retired and US sets and various other companies that I cannot remember at the moment.... so keep checking back if you are interested....
Thanks for looking, take care xx


Linda Lloyd signature logo

A Monster Day....

Tomorrow is my littlest boy's birthday and he will be a whopping 7 years old. He is a big monster, so what better card to make than a monster card... lol

October Afternoon Patterned Paper, Sentiments are computer generated, the happy birthday was cut out using the small square punch from Stampin' Up! and the monster and feet are from the Paper Dolls Cricut Cartridge, the lips are a quickutz die. And finally a Martha Stewart Edging Punch. Didn't take me too long which makes a nice change, and I am sure he will like it...
Have a great weekend, I am sure I will as I am off to a Make and Take day with a lovely lady called Steph and 28 other people who I am just dying to meet, then afterwards we are off to the Cinema to see A Christmas Carol for my little boys birthday, picking up a takeaway on the way home, I was thinking KFC, but I think he has other ideas...
Take Care xx


Linda Lloyd signature logo

WooHooooooooo......

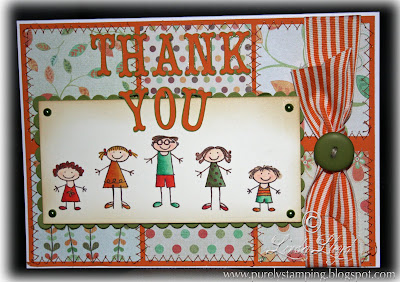
Pumpkin Pie Stampin' Up! Thank You card thumbnail Yesterday, my long awaited Blu Ray disc of The Killers Live at The Albert Hall arrived, on the day it should have been released (somehow the dates got later as time went on, but it did arrive on the original date) and guess what, the flippin Blu Ray on my computer had disappeared. Luckily HP talked me through getting it back, apparently I-Tunes (which I do have) or Norton (which I dont have) have a habit of adding files to your registry which then makes your drive disappear... so thank you HP for sorting that for me but then the software wouldn't work. DH took over my computer from work (remotely) and tried his hardest to find out why, we updated every driver you could possibly imagine (even though I have only had the laptop 6 weeks) and it still didn't work... we searched forums, websites etc trying to get to the bottom of it... finally at around 9.30pm last night we found someone who had posted that their anti virus had interfered with their blu ray software (we had turned my anti virus off) and guess what, yep, it was the same anti virus as I use, so in case anyone else has these problems Comodo Anti Virus interferes with blu ray software and has to be totally removed from the computer before it will play blu ray discs (actually it wouldn't play DVDs either, so the drive wouldn't play any kind of disc whilst this anti virus was installed on the computer even if it was turned off), so 9.45pm last night I finally got around to watching the long awaited concert (yes we were there and I just wanted to relive the greatest concert I have been to this year and I have been to a fair few.... The Killers in February, Nickelback, Boyzone, U2, The Killers in July, Spandau Ballet and yet to come, The Specials this month and Madness next month).... In case any of you are thinking of buying this DVD it is awesome, brilliant and will be played on this computer for many weeks to come, and I even managed to make a card in between watching it.... lol

So here is the card I made, it was a card I was asked to make for our Children's Church to say thank you to The Leprosy Mission for the good works that they do.


Pumpkin Pie Stampin' Up! Thank You card with Grosgrain striped ribbon I made an A5 card blank and matted it with Pumpkin Pie Cardstock from Stampin' Up!, the patterned paper was cut and sewn (by sewing machine) onto this cardstock. The Ribbon is the new Stampin' Up! Grosgrain Striped Ribbon in Pumpkin Pie and the button is from my stash. The Stamp Set is also Stampin' Up! (surprise surprise) and is called All in The Family. The THANKYOU was cut on my Cricut Expression using the StoryBook Cartridge on 1" in Pumpkin Pie Cardstock and then I cut a shadow for it in Old Olive Cardstock.

Thanks for looking everyone, will be back soon, so have a great weekend. Take Care xx


Linda Lloyd signature logo

A Few Cards..... and a really nice lady....

Have been busy this week making some cards and thought you might like to see it.... so much has been going on in my life at the moment and everything had to be put on a shelf until I get through the other side, and hopefully now I am re-emerging....

Sunday afternoon I had a phone call from my DDs boyfriend who she was out with saying his friend (they are 14) had fallen off his bike, couldn't move his leg and there was blood.... having worked on the ambulances could I please come and help him. I told him to call an ambulance and I zipped off in my car to their location. Took one look at the blood, realised it was nothing to do with his leg and all to do with the handlebars of his bike that had pierced his lower torso, there wasn't too much blood, so decided not to move him but try and calm him down. No one could contact his mother so DH went off to his to see if she was there, and meantime I managed to calm him down so much he was talking on his mobile phone to his Dad when the ambulance arrived. His mum turned up shortly afterwards and we planned that I would take his new bike to my house and lock it in my garage, so I gave her my address so she could pick it up when she was ready. Her friend then turned up and took the bike and I took off, leaving Mum, son and ambulance waiting for a back up ambulance... Well Wednesday evening there is a knock at the door, this lady remembered where I had lived and bought me a bottle of wine for looking after her son until she got there.... how kind was that, and it turns out she is a newly trained midwife who has seen my pregnant daughter on a couple of occasions for a check up.... her son started to bleed really badly once they got him on the ambulance, so I was so glad I hadn't moved him, and had to have an operation, but came home Wednesday afternoon....

Anyway, on to the couple of cards....

This is for Mum, it is her birthday on Monday, but she has gone away for a few days as a birthday treat, so had to get it made and finished for yesterday....

Recipe:- Stampin Up Old Olive, Elegant Eggplant and Lavender Lace. The flourish is cut out using my Cricut Expression and the edging is a Martha Stewart Punch. The "Happy Birthday" was made using my new Start Rite font stamps and cut out using the Window Slot Punch from Stampin Up. Old Olive and Whisper White Ribbon used along the edge. The diamond embossed rectangle that the flower is sitting on was made using acetate and a cuttlebug folder.

This card was made for my little boy's friend whose birthday party he went to last week.... I coloured a skateboarder and a fireman and my little boy chose the fireman...

Recipe:- Greetings Farm Fireman Stamp, Stampin Up Stamps, Stampin Up Tempting Turquoise cardstock, Green Galore Cardstock and Elegant Eggplant Cardstock. Real Red and Tempting Turquoise Inkpads... The Greetings Farm image was coloured in using Copic Marker and the star shape was cut out using the Stampin Up Star Punch....

That's all for today, have a good evening everyone xx


Bad, Bad Blogger

I am such a bad blogger, I try to update this every day except the weekend and this week I have failed badly, I haven't even got around to making a card using my own Sketch Challenge, although my members forum does have the latest Colour Challenge on it.

Today I have been busy making a Valentines Card for my son to give to his girlfriend, he said he wanted a heart and a bunch or roses. Unfortunately I was not sure how to make a bunch of roses as I only had single ones on my cricut and I dont have any bunch of rose stamps, so he will have to settle for a couple of roses...


At the point of photographing this card I hadn't realised that one of the roses had fallen off the front, the 2nd rose is positioned on the top curve of the heart and is now securely restuck there.
For this card I used Real Red, Garden Green, Handsome Hunter and Bravo Burgundy Cardstock. The Patterned Paper is Tea and Crumpets. The roses and hearts have been cut using my Cricut Expression using the Wedding Cart and the Indie Art Cart. The lace and bling was from my stash. The inside of the card was stamped using the Seasonal Wishes Stamp Set and the "Love You" is from the Stampin' Up! Rub-Ons. The top layer of the hearts was embossed using a cricut embossing folder.
Had a trip to the orthodontist today with DD, unfortunately her teeth have not moved enough yet, so she is to go back in 8 weeks, eventually she will have to have a bottom fixed brace to match the top one. Couldn't believe how everywhere around here is still so flooded, I took a route to the orthodontist that I wouldn't normally take, mainly because the roads around here were not gritted and they were literally skating rinks, the children had the fright of their lives on the way to school when DH braked and he continued travelling onto the other side of the road, and twice the lady behind nearly ran into the back of him because she couldn't stop, thought she would have learnt the first time...
Have a great evening all, dont forget to have a go at my Weekly Sketch Challenge... take care xx

Sketch Challenge Monday

So a bit later today, but I have finally got around to publishing my Sketch Challenge for this week, Mr Linky will be added later this evening...


Once you have finished your card add it to Mr Linky so that everyone can get some inspiration from it, tell your friends about this challenge too because the more people who enter, the more inspiration we will be able to get. You can interpret this challenge in any way that you please, you can spin it around in fact the sketch is just for inspiration you do not have to follow it exactly as it looks, it is up to you.

I have made this card today, I spent a certain time each month making more religious type cards for an ongoing order that I fulfill each month, so here is todays card...

The paper is Foofala I think, the sentiment is from Verve stamps in US. The crosses were cut on my cricut machine using Real Red Cardstock. The pretty corners are cut using a cuttlebug die and Whisper White Cardstock and little gems have been used to decorate it further. So not too much Stampin' Up! today, but watch out in the days to come as you will be seeing more.

The weather today has been awful, I took a walk into town to pay some money into the bank, I didn't realise I would get so wet, but I thought walking up the big hill would help with my weightloss although I couldn't breathe by the time I got to the top, more exercise methinks. Just to keep you updated on my weightloss, last week I lost 2.5lb and this week I have lost 2.25lb, so a weight loss of 4.75lb, so although not tons, a nice steady loss, so hopefully I wont put it back on again once I reach my target weight.

And some really exciting news, we actually got tickets to go see The Killers in concert on 23rd February at the O2 arena.... I am just soooooooo excited, the last time I saw them live was March 2007 in Berlin and before that was July 2005 when they were the support act for U2, who we went to see in Poland, so quite novel going to a concert in the UK...

Have a great evening all, take care xx


2nd Post of the Day...

Well I have been busy, busy, busy today (well not really but it feels like it). I have made another 18th birthday card, a birthday card for my StepMum (but was in such a rush to post it I forgot to photograph it), and I made a gift bag for an 18th birthday present, not fantastic but my first attempt at making a bag without using a template or instructions, so hopefully I will learn something and it will be better next time... lol


For this card I used Basic Gray Patterned Paper, and the image is a Magnolia which I coloured with Prismacolour Pencils and Sansodor. The 18 I cut on my cricut expression. The ribbon is Stampin' Up! Old Olive, plus the pink is a piece I had in my stash, the Happy Birthday sentiment is from the Stamp Set Daily Flexible Phrases and is also Stampin' Up!. The flowers are prima, and the button is also Basic Gray, I hung 2 little charms from the green thread on the button, a little pink one saying Sweet and a little key, as she is 18... and as always I decorated the inside of the card, but I never think of showing this, so have decided that from now on (if I remember) I will also photograph the inside of the card....

Old Olive Cardstock, more Basic Grey patterned Paper, and the edge was cut with my Martha Stewart Border Edge punch. The sentiment is from Stampin' Up! and is from the set Sincere Salutations.

Next is the gift bag I made, it looks quite peachy in the photograph, but is in fact more of a pink colour in real life...

Not much to say about it really, I just used stash I had laying around, and pale green cardstock from The Paper Mill Shop.. the edge again is a Martha Stewart Border Punch and the flowers were cut on my cricut expression from the In My Garden cartridge. I hope the person who it is for likes it... not quite as boring as normal wrapping paper, plus I am just no good at wrapping presents... lol
My daughter has invited me and DH to her house tonight for dinner, she is making Paella, my favourite, we dont have it at home very often as all the children complain they dont like the seafood, so it is a great treat to have it tonight, and I dont even have to cook it myself either.... bonus.
Hope you all have a good evening too xx

Dont Forget The Blog Candy........

If you haven't read about the blog candy I am giving away, go here now. It is for a Free Saleabration Set of your choice and all you have to do is make a card as per the Card Challenge on this link.

Here is a card I have made, I have lots I need to make this week, so keep a look out for them also, I do try to update my blog everyday, if there is something you would like to know more about then just e-mail me on LindaLloyd@gmx.net and I will try to help you.

I cut the shape using my Cricut Expression from So Saffron Cardstock, I then cut the other shapes using my Nestabilities Dies in Rose Red and Tempting Turquoise (all Stampin' Up! colours). The sentiment is from Papertrey Ink and the butterfly is a Spellbinders Die, I finished off by dotting liquid pearls around the edge.... hope you like it...

Would you like to earn yourself 3 free Stamp Sets from Stampin' Up!? Then check out this post here...

Or if you would like to join one of my Stampers 10 Clubs and earn a free stamp set plus £15 or more of free stash check out the link here.

Have a good day all xx

A Little Maze Book.....

But it wasn't made using Stampin' Up!.... I used my cricut to make this book, my team mates on UKS and I had a Maze Book Swap just before Christmas, a bit like a Secret Santa, but swapping Maze Books instead of presents. I will have to photograph the one I received as it is absolutely gorgeous, I just need to put some photo's in it first...


Hmmm not sure they are in the right order, but all the pages are there... hope you like it, and so easy to make too...
Well my new computer turned up this morning and after a few teething problems I have managed to transfer everything I wanted over to this one and boy is it speedy. So I will be back soon with more photos to update you with... have a good weekend all xx

Finished... WooHoo....

As you may have noticed, I am absolutely thrilled by the fact that I finished all my Christmas Cards and thy are now posted to everyone they need posting to... I even made a special one for DH's Boss.... his wife runs a chicken business advising people on how to keep chickens etc, so here is the card I made for them....


I sponged on a lot of the the Blue SU inkpads, and used the So Saffron and Pumpkin Pie for the moon. I used the Lovely As A Tree Stamp Set which I stamped in versamark and embossed with black embossing powder... I drew snow around the trees with the SU White Ink Pen. The sleigh was made using my cricut and the chickens are quickutz dies... the gold "reins" is the gold elastic from SU.

I also made another card using the Lovely As A Tree Stamp Set, it is just so versatile and can be used for almost any occasion...


I used Kraft and Real Red cardstock and Bashful Blue Patterned Paper, I embossed the trees using white embossing powder. The swirl is from the Hodgepodge Hardware set and the brads are from Stampin Up... the sentiment is from Verve Stamps...

That's all I have to show you today, if you would like to check out more of my cards, then go take a look at my other blog www.agaggleofgadgetsandscrappingtoo.blogspot.com.

Have a good evening all xx

12 Gifts of Christmas - Day 3

Today's is a simple one as long as you can get the template right, I will post a picture of a template and you can print it at any size you like to make different sizes.... of what you ask?? Well today we are going to make a....

Pillow Box

So I will just tell you that this was really easy for me as I cut out the Pillow Box on my cricut expression, so that made life so much easier, but I will include a template for those of you who have to cut by hand. You can also download a PDF file from here... The black lines are where you cut and the red dotted lines need to be scored.

Here is the cut out pillow box, it is a bit hard to see as it is see through..


Next you need to fold along all the lines and then add a bit of the double sided tape to the edge piece so that we can stick it together as shown here...

It is a bit tricky to line it up properly as the acetate has a mind of its own, but stick together with the flap on the inside, then make sure you run your fingers along the flap on the inside so that it has stuck together properly. It should then look like this.

Fold the flaps in at one end, I stuck a small amount of double sided sticky tape to one end to make sure it didn't come open, and then decorate. I did this very simply using the I Wish Simply Scrappin Kit where there are lengths of sticky patterned Paper, I then cut a scallop circle, and matted it with a 1 3/8" circle and then stuck the 1 1/4" circle on that which I had decorated.

I then filled one with Smarties (hence the sticking one end, would be a tragedy if they all fell out) and put twilight mints in the other.

These are ideal for putting on the branches of your Christmas Tree incase someone turns up who you haven't bought a present for, you can just hand one of these out, or to give out in your office. You could put a mini first aid kit in one or a sewing kit, the ideas are endless.

I will be back with Day 4 tomorrow...

I just wanted to show you a card I put together really quickly yesterday as my neighbour wanted it for her daughters 26th birthday, I didn't use all Stampin' Up! stash as my other stash is feeling a bit neglected lately, but I cannot stay away from this awesome Stamp Set...


the patterned paper is Basic Grey Sugared, the lace punch is a Martha Stewart punch, the pink ribbon is actually velvet although you cannot see that from this photograph, and the A Rose is A Rose Stamp Set was stamped using Rose Red and Bravo Burgundy Ink Pads, the leaves were Sage Shadow and Old Olive, I used glamour dust on the rose, it isn't really as glittery as it looks in the photo, it is more of an irridescent glitter, but the flash on the camera made it all sparkle. The Sentiment is from the Fast Notes Stamp Set and I cut it out using the scallop punch, I fitted the sentiment into a scallop on either side and cut out, I then used a ruler from one side of the scallop to the other and cut with a craft knife, I then did the same below the sentiment, see no need for the US's Word Window that we so desperately wanted...